Managing Patient Non-Insurance Payers

You can link a single patient account link to any number of non-insurance payers, including the patient herself, a family member, an attorney, a grant agency or any other person or organization. Likewise, you can link many patients to a single non-insurance payer.

To set up the non-insurance payers on a patient account, start by opening up a patient’s list of Non-Insurance Payers as follows:

  1. In the Navigation Bar on the left side of your screen, expand Patients, then select Patients or Patients – Billing.
  2. Locate the desired patient in the list and double-click it to open it.
  3. In the lower part of the Patient screen, select the Payers tab.
  4. On the Payers tab, select the Non-Insurance Payers tab.

Add the Patient as a Payer on the Patient’s Account

Most often, children are not payers on their own accounts, but when the patient is an adult, she will almost always be responsible for some charges, even if she has good insurance. For this reason, one of the first tasks when setting up her account will be to see that she is a listed payer. For your convenience, SOS provides a button to do just that.

When you click this “Create Patient Payer” button, a new row will appear in the Payers list, showing that the patient is responsible for 100% of the charges not covered by insurance. Double-click this new row to adjust any of the payer settings you would like. There are actually only three:

  • Percent responsibility for non-insurance charges.
  • Whether or not to charge interest for unpaid balances.
  • Whether or not to hide this payer in the payer list on a new charge entry for the current patient.

Note that there are some other options, such as whether to include this payer with printing statements, that are available to review and change. These options default in accordance with your system settings, so they only need adjustment if this particular patient has unusual billing requirements. These options can be found on the payer’s detail screen (Billing Lookups > Patient (Self) Payers). That screen looks just like the screenshot shown in the section just below this one.

Add a Parent or Other Third Party as a Payer on the Patient’s Account

To add a parent or other third party to a patient’s Non-Insurance Payers list, you must first add the payer to the master list of Non-Insurance Payers. Once that has been done, you can add the new payer to the patient’s list.

  1. On the left hand Navigation Bar, expand Billing Lookups.
  2. Select Non-Insurance Payers. The list should open on the right.
  3. Click the New icon at the far left of the top toolbar. A blank Non-Insurance Payer screen should open. Remarks about completing this form appear below the screen image.

Remarks

  • This Payer Is A
    Select either “Person” or “Organization”. If you select the “Organization”, then the three name fields will be replaced with just Organization Name.
  • Show This Payer in All Datasets
    Un-check this option if the payer should be displayed only in the current dataset. For example, if the current payer is a parent, you will not want the payer to appear in any other datasets. On the other hand, if the payer is a public one, such as an attorney or a public agency or department, it may be appropriate to have the payer available for use in all of your datasets. When in doubt, SOS recommends that you leave this option un-checked.
  • Sent To Collections On
    If you employ and outside collections agency, and this payer account has been turned over to that company, then enter the date that occurred in this field. In the future you may want to know when that action took place. In addition, SOS will suppress additional statements for this account once it has become the responsibility of your collections agency.
  • Optional GL Account #
    If you plan to export Accounts Receivable data from SOS to an external General Ledger Accounting package, you can enter the appropriate account identifier from that package in this field.
  • Payer Communications
    Add all desired mailing addresses, phone numbers, and email addresses in this Communications panel. These are added in exactly the same way as in the Patient screen. For details, refer to Entering a New Patient, Step 3: Patient Communications .

Additional Non-Insurance Payer Tabs

The Non-Insurance Payer screen includes several other useful tabs:

  • Patient Accounts
    Select the Patient Accounts tab to see Accounts Receivable data for each patient for whom the current payer is responsible. For example, if the current payer is the father and payer for each of three children, look at the Patient Accounts tab of the father’s Non-Insurance Payer screen to see a row for each of the children, detailing the date last billed, the aged balances, and other related information.
  • Checks, Credit Cards, EFT, Cash, Other
    There is a separate tab for each type of payment, so you can see the details of all the payments that have been made without having to comb through each related patient ledger. Each tab displays information appropriate to that type of payment.

Transferring or Changing Payment Responsibility for a Charge Entry

Transfers Start with an Accurate Payer (Charge Splits) List on the Charge

At the bottom of every Charge entry, on the first tab (“Charge”) is a short list that includes a line for every configured insurance and non-insurance payer that is, or was, available for the patient on the date of service. If the patient has insurance coverage and is seen over a period of time, the payers shown in the list are likely to change from time to time. The following screenshot shows a Charge, with the payer list at the bottom. This list is created at the time that the charge is initially entered, but it can be refreshed at any time to reflect relevant payers added after the Charge itself.

Insurance payers are included in the list based on the coverage dates specified in each patient’s insurance policies. Policies are found in the patient screen:

If you see more or less insurance payers in the charge split list than you think you should, it is probable that:

Manual Transfers of Payer Responsibility

In most cases, you will have some idea of how the responsibility for payment should be divided up among the patient’s payers. To adjust the amounts expected from each payer…

  1. Open the Charge entry from the Daysheet or, if already posted, from the patient’s ledger.
  2. Take note of the total fee amount in the upper portion of the Charge screen.
  3. By definition, a transfer means that you will be reducing the amount due from one payer and increasing the amount due from another payer by the same amount. In the payer list at the bottom of the Charge, open each of the payers involved one by one, change the Amount, and save. Be sure that the sum of the split amounts still matches the original total fee amount. If they do not match, the fee amount will change to match the total of the splits when you save the Charge.

Automatic Transfers

Under certain conditions, SOS will automatically make transfers for you, adjusting amounts expected from payers based on a Credit entry that you make. See, for example, Handling Larger than Expected Payments: The Auto-Transfer Feature.


See related article:

How to Refresh the Payer List on a Charge Entry

Electronic Billing of Secondary Insurance Claims

Coordination of Benefits (COB) among multiple insurance carriers is a significant service you provide to some of your clients. Many of you appear to be having difficulties with claims for secondary carriers in your electronic filing with Emdeon. I will walk you through the process so you are clear about how to bill secondary claims electronically.

1.  Primary Payer –  Regardless of whether the initial claim was sent on paper or electronically to the Primary Payer, you must  have an NEIC Payer ID entered in SOS Office Manager for that payer. To enter the NEIC Payer ID in OM, go to Lookups > Insurance Carriers  and find your Primary Payer. Once you have found it, click on the pencil icon to make a change and then go to the Additional Tab. Once there, find the NEIC/Payer # field and enter the appropriate NEIC Payer ID.  If you do not have one entered, the Claim Adjustment Reasons (CARs) will not appear on the electronic secondary claim. (Look on the Emdeon Payer List to get the payer ID.  www.emdeon.com > Payer Lists > Medical/Hospital/Dental Payers) If the Primary Payer is not on the list enter SPRNT.

2.  Secondary Payer – Go to Lookups > Insurance Carriers/Plans, select your Secondary Payer and click Edit > Additional tab. Check the radio button in front of ‘Amount received from other insurance’ in the section entitled  ‘For CMS amount paid (box 29)’.

3. Payment by the Primary Payer – The Primary Payer will either pay or reject your claim. If they pay, they will often diminish the payment by certain amounts called Claim Adjustments. As you enter the Primary Payer’s payment or transfer the balance from the Primary Payer to the Secondary Payer, you must also enter the Claim Adjustment Reasons (CARs) that appear on the Explanation of Benefits (EOB). When entering the payment, apply the money to the date of service; the screen below will pop up….click on the Claim Adjustment Reasons icon to enter the CARs.

NOTE: If you have to go back and enter the CARs after posting the primary payment has been completed, you can do so very easily. Go to the client’s ledger. Double-click on the date of service for which you need to enter the CARs. Once the transaction is open, double-click on the split to the primary insurance and click on the Claim Adjustment Reasons icon.

4. Detail the Claim Adjustment Reasons (CARs) – The next step is to decide what the total amount of the adjustments is and what dollar amount is accounted for by each of the individual CARs. Here is a simple rule to use to determine what the total amount of the CARs will be:

Service Fee  –  Primary Insurance Payment = Total CARs

Example One: Your fee for a service is $150.00; the primary insurance company paid $80.00. If you subtract $150.00 – $80.00 you are left with $70.00. All of the Claim Adjustments (CARs) for the primary payer should total $70.00.

What is accounted for in the CARs? The CARs are the reasons given by the payer for not paying your entire fee. You must enter the primary payer’s reasons and the specific adjustments or transfers so that the primary payer’s CARs can be included in the secondary claim. You will indicate if there was an adjustment made by the primary insurance for contractual reasons, if there was a patient responsibility for the service, if there was a disallowed amount, or any other reason the primary payer indicates.

To continue the example from above: The fee for the service is $150.00 and primary insurance paid $80.00. The primary insurance contractually allows only $110.00 for the service provided so they made an adjustment of $40.00. The patient had a copay of $10.00 on this service and coinsurance of $20.

Using the formula above,

FEE – PRIMARY PAYMENT = CARs

$150.00 – $80.00 = $70.00 ($40.00 + $10.00 + $20.00)

So we are now ready to enter the information in Claim Adjustment Reasons. On your EOB, you will see that each adjustment has a Group Code and a Reason Code. To enter the $40 adjustment, select the group code CO for Contractual Obligations. Then right click in the box under Reason Code and select 45 (Charges exceed your contracted/legislated fee arrangement. This change to be effective 6/1/07: Charge exceeds fee schedule). Under Amount, enter $40 and under Total Unit Paid, enter 1.

Next you will be left to account for the patient copay of $10.00 and the patient coinsurance of $20. You will enter PR as the ‘Group Code’ for Patient Responsibility. Then use Reason Code 3 (Copay amount) and $10.00. The Total Unit Paid will be 1. Enter a second line with Reason Code 2 (Coinsurance Amount), $20.00 and Total Unit Paid equal 1.

So now when you look at that screen for the Claim Adjustment Reasons you will see the following:

The claim now balances and you have accounted for the full amount of the fee.

Example Two: The fee for the service is $150.00 but the primary insurance did not pay anything because it went towards the patient’s deductible. $150.00 – $0.00 = $150 (Fee – Primary Payment = CARs), so you need to account for the full $150.00. The EOB indicates the same maximum allowable for the service as in Example One, $110.00. The EOB indicates nothing about copay. So you will enter a $40.00 fee adjustment (CO, 45) and $110 will be entered as PR, 1 (Patient Responsibility, Code 1). The total CARS will equal $150.00. Your Claim Adjustments screen will show:

5.  Generating the claim – check the box ‘Remove punctuation from data’ when you generate the claims. This should be checked regardless of whether you are generating primary or secondary insurance. In OM, go to Bills/Claims > Create HCFA/CMS 1500 Claims > highlight your option for ANSI – Emdeon and then click on Create and Output New Batch.


PLEASE NOTE: Some insurance carriers may have different requirements for how you enter the CARs. If you find that your secondary claims are being rejected for any reason that you cannot understand, you must speak to the secondary carrier for more information regarding the rejection. 

Entering Charges Using New CPT Codes

The 2013 CPT codes must be entered manually in your SOS software. SOS does not provide CPT codes nor does it update your CPT codes list. SOS 2013 does, however, provide a new feature to make adding a new entry to your list of services quick and easy.

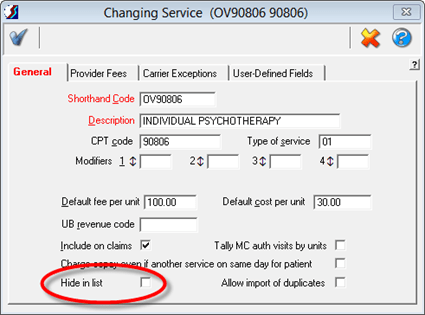
If any of the CPT codes that you use are among those changed for 2013, you must use the new CPT codes for all services rendered on January 1st, 2013 and later. if you need to file or re-file any claims prior to January 1st, 2013, however, you will have to submit them with the old codes. For that reason, you probably should retain your old codes and add new, 2013 versions of those codes. To minimize confusion, you might want to hide the old service code entries as soon as you finished entering and submitting claims for 2012 visits. To hide an item, just check the Hide in list option in the lower left corner of the Service window:


image

How do I enter a new service code?

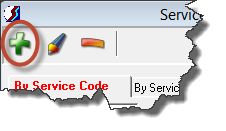
If you are entering a brand new code that is not replacing one you already have, then you should enter it manually by going to Lookups > Services. and then clicking the Add (green “plus”) icon.


SNAGHTML55e06cf


Enter the shorthand code and the description. Remember that the shorthand code and description must be unique, so you cannot use the same shorthand code or description as your old code. If you want to use that code or description for the new service item, you must first change the code and/or description in the old one. If either code or description is exactly the same as an existing entry (whether visible or hidden), an error will prevent you from saving your new entry.

If you are creating a 2013 version of an existing code, especially if the old code has several provider/provider type fees and/or carrier exceptions that you want to use on with the new code:

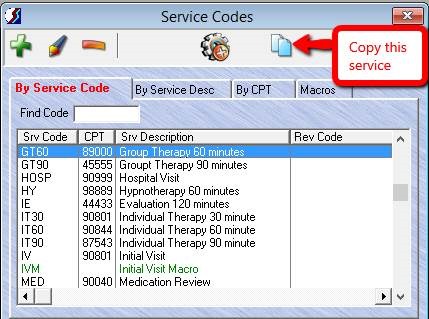
  1. Highlight the existing code code in the list.
  2. Click the “Copy” icon in the toolbar at the top of the window.
    clip_image006
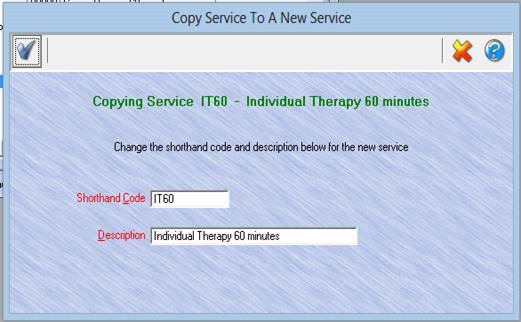
  3. A window will open, prompting you for a new shorthand code and description. Make sure you replace or change the old shorthand code and description
    in some way.
    clip_image008
  4. Click on the Blue Check icon to save.

How do I enter “Add-On” codes?

Beginning in 2013, certain types of services require the addition of Add-On codes to provide insurance payors with more detailed information about the service rendered. These Add-On codes are entered as regular service codes.

For example, let’s say that you see a client for “Psychotherapy for 45 minutes with Interactive Complexity”. Prior to January 2013, you would have created a single charge entry, using the service code in your list that designates 90812 as the CPT code. After January 1st, 2013, you would use 90834, which indicates “Psychotherapy 45 minutes”, and a second charge entry for 90785 for “Interactive Complexity”. So prior to January you would have entered one charge for this client with the CPT code 90812. After January 2013 you have to enter two services: one with 90834 and one 90875. Each code has an assigned fee, make sure you verify with your payers to get that information. If you must file the additional code with a fee of zero, then you must be sure to assign the service code to a Service Category (Lookups > Service Categories). If needed, just create a new category which you can name “Zero Fee” or something of the sort, and assign your new Add-On service to that category. OM will always include “include on claims” services that are part of a Service Category on your claims, even if there is no fee for the service. For more information, see Printing Claim Detail Lines When Fee Is Zero.

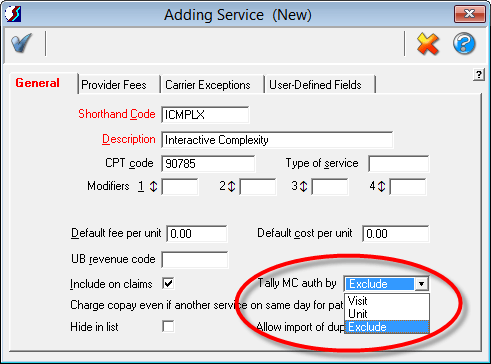
The use of Add-On codes can have the unintended consequence of causing your authorization visit tallies to be incorrect. Both the main and Add-On codes will each be counted, so a single actual visit will reduce SOS’s count of remaining visits by two instead of just one. In the January 31, 2013 update a change was made to the Tally MC Auths by the option on the Service form (Lookups > Services) so that you can now select “Exclude” rather than the prior options of “Visits” and “Units”:

If your practice requires the use of Add-On codes like the one above, you will have to create at least two charge entries for the same date of service. In SOS, the fastest and easiest way to enter two or more related services is through the use of Service Macros.

What is a service macro and how are they entered in OM?

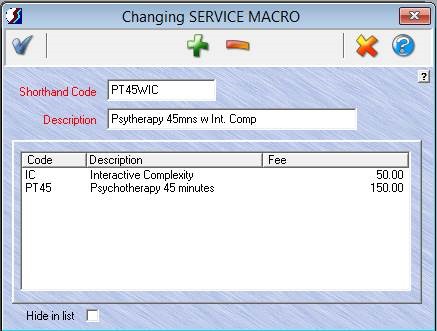
If some of these code combinations will be used frequently in your practice, you will want to use an SOS service macro to make your data entry faster. A service macro is used like a regular service code, but when you save a charge entry in which a macro code is used, SOS will expand it, creating two or more charge entries for you – one for each of the codes that the macro contains. Returning to our example above, we want to enter both a 90834 and a 90735 to describe the service that was rendered, so we will first create a macro that contains both of those service codes.

To enter a Macro:

  1. Go to Lookups > Services > Add a Macro(the gear with plus sign icon).clip_image010
  2. Once you click Add a Macro, a window will open. Enter a shorthand code and a description, such as “Psychotherapy 45 minutes and Interactive Complexity”.
  3. Next, click ADD (green “plus” icon) to attach the two service codes that will make up this macro, . Once the two codes are entered it will look like the screen below.
  4. Click Save (blue “check” icon).

Create macros for all the different code combinations that you will be using. Macros will appear in green in your service code list. You can maintain (change or delete) your macros on click the Macro tab of Lookups > Services.

How do I enter a macro charge in the daysheet?

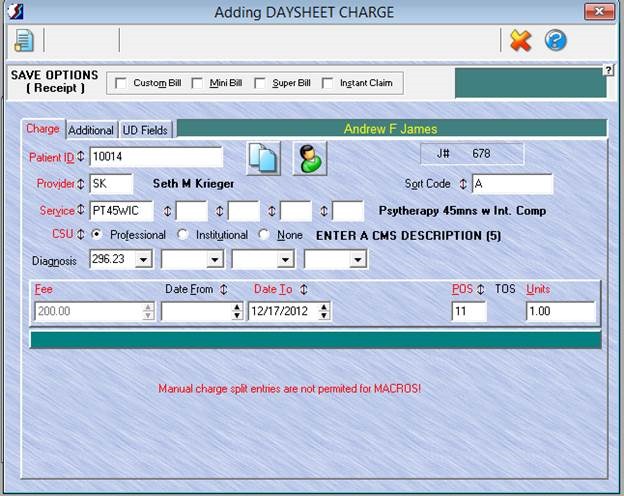
Still using our example, let’s use our new macro to enter a charge in the daysheet. Start your new charge entry normally, completing all fields as you usually do, except for the Service field. For Service select your new macro from the Services lookup list instead of an individual service code. (If you import your appointments from the Appointment Scheduler or from Case Manager, use the macro code for the service when you enter appointments or progress notes.) Additionally, you cannot enter a fee as you normally do. The screen will show the total of the default fees specified in each service contained in the macro. You will have an opportunity to make changes in the next step. Make sure that you have a value in each of the required (red) fields. You will notice that you will not see any splits in the lower part of the window as you usually do.


clip_image012


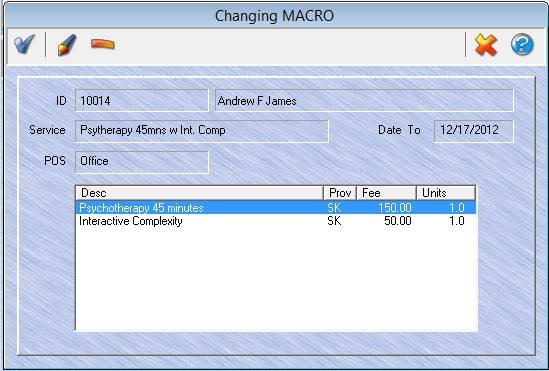
When you click Save (blue “check” icon) on the main charge entry screen, a “Changing MACRO” window will appear, showing the way the macro will be expanded, with one line for each daysheet entry it will create. If you want to change the provider, fee, units, or other values for any of these about-to-be-created charges, this is your opportunity to do so. Just double-click the item you want to change (or highlight the item and click the Change icon (“pencil”) in the toolbar. When you have completed any desired changes, proceed by clicking Save (the “check” icon).


clip_image014


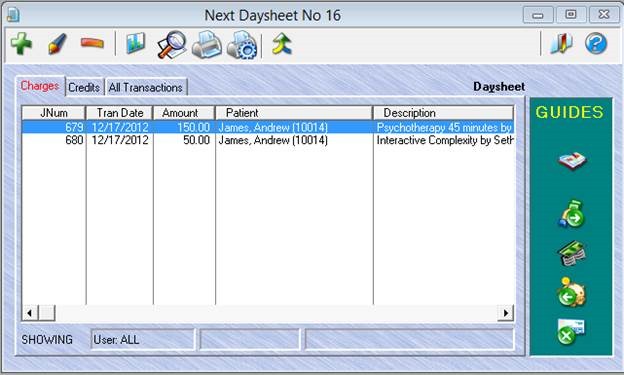
Below you can see the result: one charge for 90834 and another for 90735.


clip_image016

How to Batch Claims Using Carrier Category

At times it is desirable to batch claims according to a particular payor or payors. Examples include:

  • Generating a batch of Medicare paper claims using the Medicare-specific formats.
  • Generating electronic claim submission files for just selected payors.

The most efficient way to proceed is by using the Carrier Category setting on the Additional tab of your Carrier/Plan form (Lookups > Insurance Carriers/Plans).

9-26-2011 4-27-33 PM


Create and assign the same Carrier Category to each of the Carrier/Plans that you want to group together for insurance claim runs.

When it comes time to generate insurance, just specify the desired Carrier Category in the batch options to create a batch that contains only claims for those payors assigned to the specified category:


9-26-2011 4-39-15 PM

Note that even a blank category field is significant. If you have assigned certain payors to a category, they will not be included in the batch if you leave the batch option for Carrier Category blank. That is, a blank Carrier Category will match only those payors with no category selected on the Additional tab.