System requirements and recommendations
Moving SOS is not difficult, not even when migrating to a new server. Before committing to new hardware, however, you might want to review the system requirements and recommendations for the current generation of SOS (Releases 2010 through 2015), as well as what we anticipate going forward to the next generation of SOS.
The current software should run fine on most any current Windows desktop or laptop PC used as a network workstation or as a standalone SOS implementation for a small practice. Scaling would normally be just a matter of adding more RAM. Server requirements will vary depending on the roles running on the system, the size of the SOS database, and the number of simultaneous users. For specific details and recommendations, please see the following document:
https://sos-resources.info/g4/210-system-recommendations-for-sos-2010-and-later/
Next, you might want to consider future requirements, as SOS 2016 is expected to be the final version using the current technology. It will be followed by completely re-written, modern software running on the Microsoft .Net platform. You will be able to deploy this new generation of SOS as a local standalone application, a local client-server installation (similar to the current software), a web-based application running on a web server on your own local network, or alternatively, running on a cloud infrastructure service such as Microsoft Azure or Amazon EC2. You will also be able to run a mix of locally-installed Windows software and users accessing the web-based software. It is expected that virtually all multi-user deployments will be as web-based software because of the relative simplicity of deployment and management, and the potential to run the software in a modern web browser on most any computer or tablet. For more information, please see:
https://sos-resources.info/g5/system-requirements-for-next-generation-sos-products/
Moving the current software to a new computer
Turning to the matter of moving the current software to new hardware, here is a step by step guide:
-
Install the SOS software on the new computer, using your most recent CD, or using a complete installer (not a patch/update) downloaded from the SOS web site’s Download Files page. It should be the same version or newer than the one you are currently using on the old computer. (There is no need to install any earlier versions or CD’s.) If you have a current support contract, the installer for the current release is usually available on the SOS web site. If you must go from your current version to a newer version on the new computer (such as SOS 2009 on the old computer to SOS 2010 or later on the new computer, you must also upgrade the version of the database engine, making the process more complex. Contact SOS support for guidance.
-
Ideally, you should then back up the entire SOS folder on the old computer, including all sub-folders. Backing up the entire SOS folder will assure that you will be moving the entire set of files, including any updates or patches that you have downloaded and installed, custom reports, claim files, and any other personal files you may have created and stored there.
-
Restore the backup on the new computer. Depending on how you did your backup, your restore will be done differently. If you just copied the files to a DVD or USB drive using Windows Explorer, restoring the files is a simple matter of copying from the DVD or USB drive back to the matching folders on the new computer. If you did a backup using backup software like NovaBackup, then your target for the restore should be the appropriate drive letter on the new computer. The folder information is stored in the backup, and when you restore from your tape or other media, the files will be put back in their original folder locations. IMPORTANT: If you copy files from a DVD or CD using Windows Explorer, the copies on the new computer may all be set to “Read-Only” status. When you have finished copying the files, you should highlight all the files in each of the folders and reset the properties to uncheck the Read-Only setting: Highlight the files, right-click for the context menu, then left-click on Properties. Uncheck the Read-Only box under Attributes.
-
Go into SOS on the new computer to make sure that the data has transferred correctly. Only after you are certain that the software runs on the new computer and the data is intact should you remove the program from the old computer!
If you are moving a standalone installation or a database server installation, and you are putting the SOS folder in a different location (such as on a different drive letter, or placing it within a different folder on the new system), you may have to reset the transaction log file name embedded in the database during a previous database rebuild operation. If you fail to do so, the database will not start. The steps to reset the log file name appear in the box below:
-
-
Open a command prompt window (Start > Run, then enter CMD or COMMAND and click OK).
-
Change to the \SOS\DATA folder on the appropriate drive. (Type the drive letter followed by a colon and press <enter>, then type CD \SOS\DATA and press <enter>.) The command prompt should now show the correct drive and path, for example:
C:\SOS\DATA
-
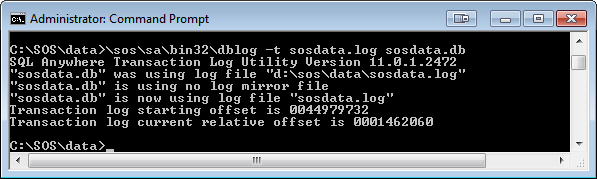
Enter this command (SOS 2010 or later):
\SOS\SA\BIN32\DBLOG -t SOSDATA.LOG SOSDATA.DB
- This command removes the hard-coded path from the filename so the database will use the SOSDATA.LOG file in the same directory as the database files. You should see something like this:
Uninstalling the SOS Software from the old computer
Once you have confirmed that your new system is working fine and that the data is intact, you must completely remove the SOS applications from your old computer. If you want to backup the entire SOS folder just in case, that is fine, but you cannot leave a run-able copy on the old system. In order to completely remove SOS Office Manager for Windows from your computer, use the Windows Uninstall procedure, remove any SOS folder that remains, and empty the Recycle Bin. Here are the steps:
-
In Windows XP: Click on Start > Settings > Control Panel > Add/Remove Programs.
In Windows Vista or Windows 7: Click Start > Control Panel > Programs and Features.
In Windows 8 - 10: Press the Windows START key on your keyboard,  type control panel then click
"Programs and Features" (if in Icon view) or click the "Uninstall a program" link under "Programs"
(if in Category view).
-
Scroll down in the box listing your software programs until you find “SOS Applications”.
-
Highlight and click on the Remove or Uninstall button (or Right-Click SOS Applications, then select Uninstall).
-
When you are asked if you are sure you want to completely remove _____ and all its components” click “Yes to All”. If you are asked for any more verifications of your intention to remove all parts of the program, indicate “Yes”. When you have finished removing all the SOS applications, close the list window and close Control Panel.
Configuration of the new computer
Database Servers
Edit the SERVER.PRM File in the SOS folder
For readability, we suggest you type each parameter on a separate line. Here is an example:
The recommended network packet size for SQL Anywhere 11 (the database engine provided with SOS 2010 through 2016) is 7300 bytes. Make sure that is specified in your SERVER.PRM by the parameter:
-p 7300
In addition, to close a potential security threat, SOS strongly recommends that you add the parameter “TDS=NO”, in parentheses, after “-x tcpip”. Here is an example:
-p tcpip(TDS=NO;PORT=2638)
The -c, -cl, and -ch relate to the cache size available on the server to run the software. The -c parameter sets the amount of cache requested when the database starts up. The -cl parameter sets the lower size limit for the cache. Finally, the -ch parameter sets the maximum amount of RAM the database will use for cache, even if substantially more is available on the host computer. It is acceptable to omit all three settings, allowing the database engine to dynamically adjust the cache size as it sees best, but unless the server is dedicated to just running the database, you may want to set realistic size limits so that other processes won’t have to compete for RAM.
The best and simplest option for getting optimal performance from a large database is to run it on a 64 bit Windows system with an abundance of RAM. Ideally, you would have enough RAM installed in your system so that the entire database can be cached. In that case, allowing a larger cache is simply a matter of increasing the value of the –ch parameter in the SERVER.PRM file located in the SOS folder on your SOS database server computer. If you have, for example, 12 GB of RAM in your 64 bit system, you could allocate 9 GB of that RAM for potential use as database cache by including:
-ch 9g
in the SERVER.PRM file in the SOS folder. Remember, that parameter just sets an upper limit, it does not mean that 9 GB of RAM will be immediately reserved for use by the database. The amount actually used will go up and down in accordance with the amount of unused RAM in the system and the amount the database would like at any given time. In general, an upper limit size similar to the size of all the DB files (*.DB) in the \SOS\DATA folder will give you the best possible performance. Alternatively, in a 64 bit environment you can simply remove the -ch parameter entirely, which allows the database engine to dynamically size the cache based on resources available.
Windows 32 bit platforms are fine for smaller databases, but because they normally limit you to 1.8 GB for database cache, regardless of the amount of physical RAM in the computer, those with larger databases should really be using a 64 bit server.
The -tq switch shuts down the SOS database at a specified time. (Restarting the database once daily is recommended, and you should do your backup while the database is down.) The time is entered as military time. For example, if you want to shutdown the database at 10:00 PM you would enter…
-tq 22:00
in the SERVER.PRM file.
Delete and Re-create the Database Service
You may have been running your database on your old system as a Windows background service, or perhaps you want to start doing so. The main advantage to running as a service is that the database will start and run whether or not anyone is logged into the server computer’s console. Services created in versions prior to SOS 2010 appear in the Windows Service Manager in the form:
Adaptive Server Anywhere – mysos
where “mysos” is the name you gave to the service when you created it. You must first remove the existing service, if there is one, then create a new one. The new one will appear in the list of services with a name in the form:
SQL Anywhere – mysos
To delete an existing SOS database service:
-
Open a command window, being careful to use the “Run as administrator”. (That is, type CMD in the Start menu Search field, then right-click CMD.EXE in the search results and select “Run as administrator”.)
-
Even if you plan to run the 64 bit database engine, change to the \SOS\SA\BIN32 directory:
-
CD \SOS\SA\BIN32 <enter>
-
Assuming that the name of your existing service is “mysos”, delete it with this command:
-
dbsvc –y –d mysos
To create the new service:
-
If you are not already in a command window running with Administrator rights, follow steps one and two above.
-
Now create the new service with the command below.
The options in this example will set the service to run:
- under the system account (-sa),
- as a network service (-t network),
- to start automatically (-s auto),
- and to be named “mysos” (-w mysos)
It will appear in the Windows Services Manager as “SQL Anywhere – mysos”
If you are running the database in 64-bit Windows, using the 64-bit option is recommended, but either version of the engine will work. The 64-bit engine often provides better performance, especially for larger databases. If you are running in 32-bit Windows, you MUST use the 32-bit command. These commands would be typed on a single line, of course.
Note: Service configuration commands are case sensitive. Type your options exactly as shown (eg: “automatic” will fail but “Automatic” will work). If you still have trouble getting the service created, leave out the “-s Automatic”. You can change the property to “automatic” from the Services applet after the service has been created.
32-bit Windows (all on one line):
dbsvc -as -t Network -s Automatic -w mysos c:\sos\sa\bin32\dbsrv11.exe @c:\sos\server.prm c:\sos\data\sosdata.db
64-bit Windows (all on one line):
dbsvc -as -t Network -s Automatic -w mysos c:\sos\sa\bin64\dbsrv11.exe @c:\sos\server.prm c:\sos\data\sosdata.db
-
After executing the command, you will find a new Windows service listed in Windows’ Administrative Tools > Services applet: SQL Anywhere – mysos. You can adjust the properties for the service just as you would for any other service.
For more detailed discussion and instruction for running SQL Anywhere as a Windows service, see:
Running the SOS SQL Anywhere 11 Database as a Windows Service
Adjust Scheduled Tasks
You may be using one or more Scheduled Tasks in Windows to control starting or stopping your database. Normally stopping the database automatically is handled with a –tq parameter in the SERVER.PRM file, such as:
-tq 22:00
to automatically shut down the database at 10:00 pm, but if running as a service, it is possible that you are using a scheduled NET STOP <your database service name> command to do so. Either way will work fine.
You probably will want to automate restarting the database after your nightly backup, whether you run the database engine as a foreground task, or as a Windows service. Here is an example of both STOP and START commands:
Inspecting the files in the SOS folder, you might find a CMD or BAT file that launches the database. If so, edit the batch file, making any necessary changes. That command file might include a NET START command that doesn’t reference the correct service name. In that event, change the command to start the correct service. The name, of course, should match the name of the service you created above. Check the properties of the new service in your Control Panel > Administrative Tools > Services to be sure of the name. Once you open the Properties dialog for the service, you will see the service name at the top of the first tab, probably in the form “SQLANYs_mysos”. You should be able to use the verbose name in the Services list, as in the example above, or the short name in the Properties dialog. Both should work equally well, though make sure you include quotation marks around the verbose name to prevent issues with the embedded spaces in the string.
Once you have the command corrected, whether it is to start the database service or launch the engine as a foreground application, create a scheduled task in Windows task scheduler to execute the command or command file every morning before staff arrives to work.
IMPORTANT: If you run the database engine as a foreground task, you must not logout of the server console. If you do, the database will shut down. That is another reason to run it as a service in the background.
Network Workstations
After installing the new version of the software on a network workstation, including a terminal server, check the ODBC settings to be sure that the Buffer Size setting on the Network tab is set to 7300 bytes to match the packet size setting on the server. While on this tab, note that specifying the IP address of your database server as a TCP/IP parameter in the form: HOST=123.123.123.123 (using your own server’s address) is sometimes necessary if the workstation cannot otherwise locate and connect to the database server. Unless you are having a problem, do not specify this parameter. Also on the Network tab is an option to Compress network packets. Using this option can make a significant performance improvement on some networks, but can slow things down on others. If your servers and workstations are relatively speedy, but your network is slow, this option should help. On the other hand, if your server and/or workstations are already working pretty hard, and you have abundant network capacity, checking this option may actually slow things down. You will have to experiment to know for sure. Test by timing the generation of large reports.
Firewall issues are the ones most often responsible for client-server communication problems. Make sure that you open port 2638, which is the one used by the SQL Anywhere engine by default.