Help system for SOS does not work in Vista, Windows 7 or Windows 8

On a stock Window Vista, Windows 7 or Windows 8 computer, attempts to access the built-in help system in SOS modules will result in an error message, stating that your current version of Windows does not support the program’s help system. The needed help system software is available on the Microsoft Downloads site, from which you can download and install the missing component.

The following page on the web contains links to the correct WinHlp32 installer for all of the current versions of Windows, including Vista, Windows 7, and Windows 8:

http://www.microsoft.com/en-us/download/search.aspx?q=WinHlp32.exe

Moving SOS to a New Computer

The following instructions are for standalone installations, where the application software and the database are on one computer. For server migration, this article should be consulted.

Many practices are finding that their old hardware has become outdated. While those old machines have provided excellent service, they have become too slow, too limited in RAM, and too congested in hard drive space to continue serving well. Making the move to a new machine is not difficult as long as you follow certain steps.

  1. Install the SOS software on the new computer, using your most recent CD or the appropriate downloaded installer.  It should be the same version or newer than the one you are currently using on the old computer.  (There is no need to install any earlier CD’s.) If you don’t have a CD for the same version of the software, check to see if there is an installer for your version available on the SOS web site, or call SOS support. If you have a current support contract, the installer for the current release is usually available on the SOS web site. If you must go from SOS 2009 or earlier to a more recent version on the new computer (such as SOS 2009 on the old computer to SOS 2015 on the new computer, you must also upgrade the version of the database engine, making the process more complex. Contact SOS support for guidance.
  2. Ideally, you should then back up the entire SOS folder on the old computer, including all subfolders. Backing up the entire SOS folder will assure that you will be moving the entire set of files, including any updates or patches that you have downloaded and installed, custom reports, claim files, and any other personal files you may have created and stored there.
  3. Restore the backup on the new computer. Depending on how you did your backup, your restore will be done differently. If you just copied the files to a DVD or USB drive using Windows Explorer, restoring the files is a simple matter of copying from the DVD or USB drive back to the matching folders on the new computer. If you did a backup using backup software like NovaBackup, then your target for the restore should be the appropriate drive letter on the new computer. The folder information is stored in the backup, and when you restore from your tape or other media, the files will be put back in their original folder locations.IMPORTANT: If you copy files from a DVD or CD using Windows Explorer, the copies on the new computer may all be set to “Read-Only” status. When you have finished copying the files, you should highlight all the files in each of the folders and reset the properties to uncheck the Read-Only setting: Highlight the files, right-click for the context menu, then left-click on Properties. Uncheck the Read-Only box under Attributes.
  4. If you are moving a standalone installation or a database server installation, and you are putting the SOS folder in a different location (such as on a different drive letter, or placing it within a different folder on the new system), you may have to reset the transaction log file name embedded in the database during a previous database rebuild operation. If you fail to do so, the database will not start. The steps to reset the log file name appear below:
    1. Open a command prompt window (Start > Run, then enter CMD or COMMAND and click OK).
    2. Change to the \SOS\DATA folder on the appropriate drive. (Type the drive letter followed by a colon and press <enter>, then type CD \SOS\DATA and press <enter>.) The command prompt should now show the correct drive and path, for example:
      C:\SOS\DATA.
    3. Enter this command (SOS 2010 or later):
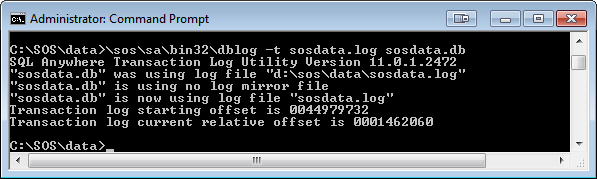
      \SOS\SA\BIN32\DBLOG -t SOSDATA.LOG SOSDATA.DB
    4. You should see something like this:dblog
      This command removes the hard-coded path from the filename so the database will use the SOSDATA.LOG file in the same directory as the database files.
  5. Go into SOS on the new computer to make sure that the data has transferred correctly.  Only after you are certain that the software runs on the new computer and the data is intact should you remove the program from the old computer!

Uninstalling the SOS Software from the old computer.

Once you have confirmed that your new system is working fine and that the data is intact, you must completely remove the SOS applications from your old computer. If you want to backup the entire SOS folder just in case, that is fine, but you cannot leave a runnable copy on the old system. Using the Windows Uninstall procedure, remove the programs, then manually remove any SOS folder that remains and empty the Recycle Bin.  Here are the steps:

  1. In Windows XP: Click on Start > SettingsControl Panel > Add/Remove Programs.
    In Windows Vista/7/8: Click on StartControl Panel > Programs and Features.
  2. Scroll down in the box listing your software programs until you find the “SOS Applications”.
  3. Highlight and click on the Remove or Uninstall button (or Right-Click, then Uninstall).
  4. When you are asked if “you are sure you want to completely remove _____ and all its components” click Yes to All.  If you are asked for any more verifications of your intention to remove all parts of the program, indicate “Yes”.  When you have finished removing all the SOS applications, close the list window and close the Control Panel.

Potential Security Vulnerability (TDS) Fix (incomplete)

(The following information is relevant only for those running the SOS database in networked mode. If you are running a standalone configuration of SOS, without the keyword “tcpip” in the SERVER.PRM file, there is nothing you need to do.)

Although this vulnerability applies primarily to Sybase’s larger, enterprise product, SOS strongly recommends the following, easy procedure to prevent any use of a similar exploit against your SQL Anywhere database.

  1. In your SOS folder, look for the SERVER.PRM file and open it with Notepad or any other plain text editor (NOT using a word processor like MS Word!). You could, for example, open Notepad on your server, then load the SERVER.PRM file, located in your SOS folder.
  2. Find the -x tcpip parameter. It may or may not be followed by one or more parameters within a set of parentheses.
  3. If there are no parentheses, then add (TDS=NO) immediately after the -x tcpip. If there are already parentheses and one or more parameters, then add a semi-colon and TDS=NO just before the closing parenthesis. See the examples below.

Examples:

The change will take effect next time you shut down and restart the database. To be sure, after restarting the database, go into Office Manager or Case Manager, then select HELP > VERSION INFORMATION. Click the DB tab and examine the “Server Startup Command” at the bottom of the window:

Performance Tip: Match Server CPU and RAM to the Number of Users on Your System

RAM

If you call SOS with a complaint about software performance, the first thing a technician will check is the amount of RAM you have configured for the database to use for cache. The larger your cache, the more of your database that can be copied from the relatively slow hard drive to much faster RAM memory, and the faster your database can respond to the software’s requests for data. Insufficient cache because of too little physical RAM in the computer or because of a simple configuration oversight can be deadly, especially for reporting.

CPU

Everyone has had the experience of standing in a long line at a supermarket because there was only one cashier on duty. In most cases, at some point a manager will notice the log-jam and open additional registers. Waiting shoppers quickly spread out among the new cashiers, and in short order the situation is resolved. New shoppers arriving at check-out have little or no wait.

A very similar thing can happen with your SOS database server. Retrieving, adding, updating, and deleting data in SOS all take the form of database queries or commands. Each must be executed in turn, and the execution of these commands requires computing resources – specifically memory and CPU resources — on the server computer.

Recently SOS technicians received a couple of calls from customers who were experiencing poor performance in SOS. In both cases they discovered that the customers had adequate RAM but just one CPU core available on the database server to handle the work being sent to it by between 9 and 30 users. It was therefore no surprise that reports were taking “forever” to run, and that users were complaining about getting “locked up”. In that situation, frustrated users often resort to drastic measures, like rebooting their computers or force-stopping SOS while it is waiting to complete some process that has not run to completion. That just adds to the problem because the database must now also clean up the mess left by the rebooting users. The single CPU core is similar to the one cashier in the supermarket. He or she may be working at top speed, but to the person at the end of the line, it feels like nothing is happening.

For the store, the solution is to add more cashiers. For your SOS database, the solution is to move the database to a computer with more CPU cores. Fortunately, modern computers, even relatively inexpensive ones, typically have at least two to four core CPU’s. More and more frequently you will find computers with advanced processors that allow six or eight processor paths, even if there are only three or four actual CPU cores. The Intel Core i7, for example, is a high-performance, quad-core processor found in many computers in the $700 to $1,000 range, but which provides software with eight parallel execution pathways. In an environment of that kind, thirty to fifty users will rarely find themselves waiting around for very long!

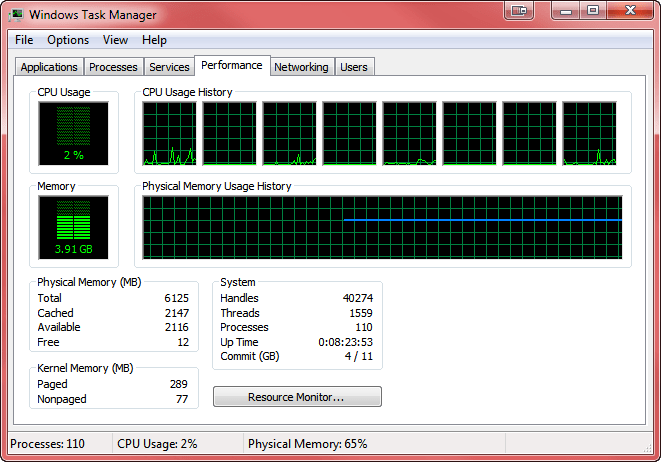
In the screenshot below, showing the Performance tab of Windows Task Manager, you can see the eight parallel processing paths available on an Intel Core i7 CPU:
taskmgrcpu

How Do I Know If I Have One of These Issues?

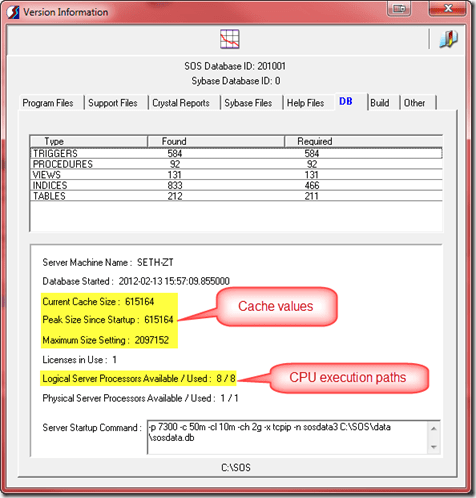
There is a quick and easy way to check your cache and CPU situation. From the top menu in OM or CM select Help > Version Information, then click the DB tab.
dbtab

Examine the cache values (best done at the end of a busy day). If the peak size is less than the maximum size setting, you have ample cache, at least for now. If the numbers are the same, then it is likely that you would benefit from adding more cache, either by increasing the maximum size setting in your SERVER.PRM file, or if necessary, by adding more RAM to your system (if possible). For more detail about cache settings, see http://www.sosoft.com/fod/doc435-enhancing_perf_large_db.pdf

To see how many CPU execution pathways are available in your computer, check the “Logical Server Processors Available” line. If you see “1/1” here and you have more than two people on your system, you are going to really suffer. Even one person running a standalone copy of SOS can encounter issues in that situation and would see much better computer performance across the board by upgrading to at least a dual-core computer.

Some settings make use of virtual servers that can be configured to use a specified number of the host computer’s CPU cores. Often the default setting for virtual machines is just one processor core, even when the host system has four or more available. If your database is running on a virtual server and SOS shows “1/1” Logical Processors Available, you should adjust the virtual machine settings to allow it to use more of the host computer’s cores.

Database Settings Can Make a Difference

There are two internal database options that can make a significant difference in performance: max_query_tasks and optimization_goal. In most cases, the former should be set to 1, and the latter to “All-rows”. To determine your own settings, check in Reports > Other Reports in OM to see if you have the report “Database Performance Options”. If not, you can download it from here: http://www.sosoft.com/files/downloads/dbperfopts.rpt and install it in the Other Reports menu using these instructions: http://www.sosoft.com/fod/doc474-adding_new_report.pdf.

2-14-2012 5-11-21 PM

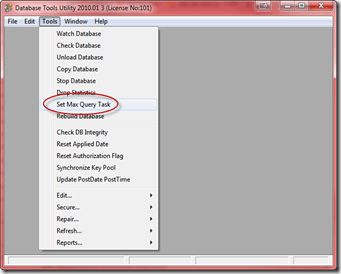
If max_query_tasks is not set to 1, you can change it using a tool on the tools menu in DBA Utilities. Using an SOS login with security administrator rights, click the Admin icon on the login window, then go to Database Tools > DBA Utilities. Click Set Max Query Task. That item is a toggle that switches the setting back and forth between 0 and 1. When set to 1 it should display a checkmark next to the menu item, but it is a good idea to confirm the setting with the report and re-toggle if it is not set as you wish.
2-14-2012 5-15-51 PM

There is no utility to reset optimization_goal, but an SOS support tech can establish a remote connection to your system and reset it for you.

Consider a Server that is not a Server

One thing that is important to understand is that it is not necessary to run the database on a computer that says “server” on the box, nor is it necessary to have Windows Server xxxx as the operating system on your SOS database computer. For example, instead of adding an official “server,” you can add a computer running Windows 7 Pro on an Intel Core i7 or similar CPU to your network, install a copy of SOS using the “server” option, move your database over, and fire it up. Remember that it is not recommended that you map the database server’s SOS folder as a network share, so Microsoft’s 10 user limit on non-server versions of Windows is not an issue. Database access over the network is not done with Windows shares and therefore does not count against that limit. You can therefore have dozens of users on the database even though it is running on Windows 7 rather than Server.When upgrading a server is not a possibility for one reason or another, this approach can provide the same results for a fraction of the cost.

Note that if you plan to use your server as both the database server and a terminal server, then you must run a Windows Server operating system (such as Windows Server 2008, or Server 2008 R2). You cannot use Windows 7 as a terminal server.
Mail Merge Labels in Word Using Query Results

This document presents a sample query that, when run using the SOS-supplied DBISQL utility, produces an EXCEL file that can be used as the data to produce a set of mailing labels in MS Word. There is a document on the SOS web site that describes how to run queries:

http://www.sosoft.com/queries/how2010/

Specifically, it selects from the main data set (licnum = 101), only certain primary providers, and only those with a non-zero service within the last 270 days. The results of the query are saved in a file called LABELS.HTML in the SOS folder on the C: drive (see last line of the query). You can copy and paste the query below directly into DBISQL, then make any changes you like before running it.
SELECT
TRIM(a.firstname) AS “First Name”,
TRIM(a.lastname) AS “Last Name”,
a.addr1 AS “Address 1”,
a.addr2 AS “Address 2”,
TRIM(city) AS “City”,
TRIM(state) AS “State”,
zip
FROM
rv_patients a
JOIN ptvars b ON a.ptnum = b.ptnum
WHERE
a.licnum = 101
AND a.priprvcode IN (‘AB’,’CD’,’EF’,’GH’)
AND b.lfeedate > (TODAY() – 270)
ORDER BY
a.lastname, a.firstname
;
OUTPUT TO c:\sos\labels.html FORMAT HTML

Once you have run your query successfully, open the resulting XLS file in MS EXCEL and re-save it. That will put it into the file format that your particular version of MS Word likes best. Now open your web browser and go to:

http://www.sosoft.com/files/tv/other/querylabelmerge.swf

to view a short Flash video that demonstrates how to create your labels using the output of your query. Depending on the speed of your internet connection, the video may take a while to load. (If you don’t have the Flash add-in installed, your browser will probably offer to download and install it for
you.)