Automatic Selection of Data Source When Starting DBISQL

Normally when you open the DBISQL query utility, you must provide your SOS User ID, your password, and select the data source:
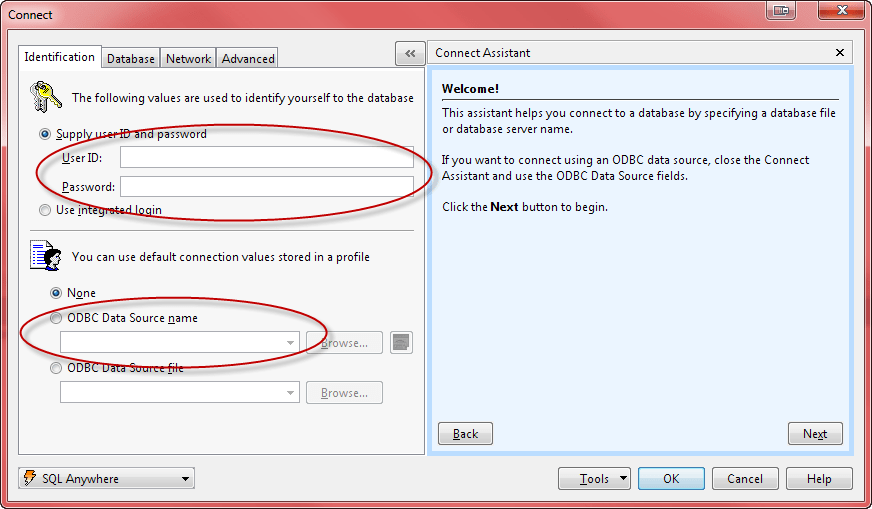
DBISQL_Login

Because of the potential security risk, you would not want to default values for your ID and password, but it would be a convenience if there were a way to automatically select the SOSDATA data source. Very few SOS users would have any reason to select anything else for that field.

It turns out that you can specify the data source when DBISQL is launched, sparing you the need to enter it every time. Here is how it is done. (The images below are from Windows 7):

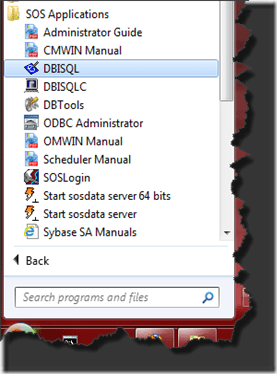
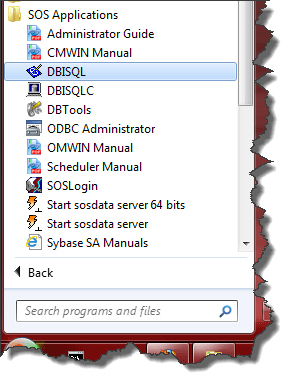
    1. Find the shortcut in your Windows Start menu for DBISQL. Normally you would find it at Start > Programs > SOS Applications.DBISQL_StartMenu
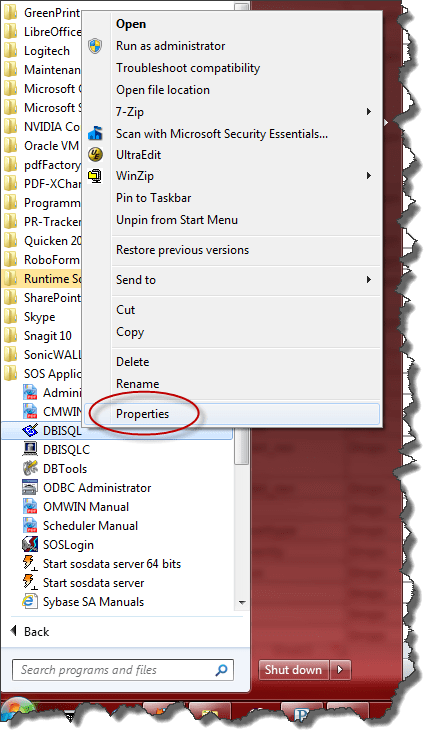
    2. RIGHT-click the DBISQL shortcut to open the context menu, then LEFT-click Properties at the bottom of the menu to open the Properties window:DBISQL_shortcutprops
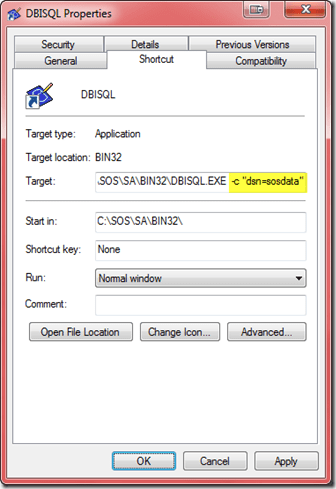
    3. In the Properties window you will see the Command Line that Windows uses to launch the program. Simply add –c “dsn=sosdata” to the end of that line. When you are finished it will look like this:DBISQL_CommandLine
    4. Now just click OK to save. If you have a shortcut pinned to your Start menu or on your desktop, you can go through exactly the same steps to change those as well.

Updated 2/27/2019

Creating and Maintaining a Custom Droplist in First Contact

The following is a further elaboration of the feature documented in the First Contact User Guide, in the FCConfig – Field Selection and Options section.

In that section there is a discussion about changing text entry fields to droplists that are populated with selections you maintain from the My Lists screen in First Contact. It mentions that in some cases a field that is initially a te (text) type, can be changed to a drop or combo type, linked to a user-specified list. A drop field type is one where the user must select an option from a fixed list of choices. A combo field type is like a drop, except that it also permits the user to type in something new that does not appear in the list.

The first step is to consult with an SOS tech support rep to see if the field you would like to change to a list-linked drop or combo is eligible for such a modification. If it is, the tech will use a special program to modify the field type for you, using a remote support utility.

The next step will be to create the list containing the desired selections you want to appear for that field:

  1. Open First Contact and click the My Lists icon at the top of the screen.MyLists
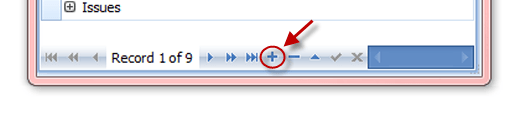
  2. At the very bottom of the Lists window, notice a bar with small buttons. Click the plus sign to add a new list:AddList
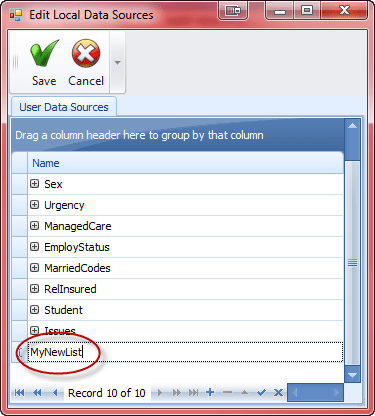
  3. An empty row will appear in the My Lists window. Type in your new list name, which should be unique and contain neither spaces nor punctuation, then press the ENTER key on your keyboard:NameForNewList
  4. Click the Save button at the top of the window.
  5. Now that your list has been created, you can add the desired items to the list. Click the My Lists button to re-open the My Lists window.
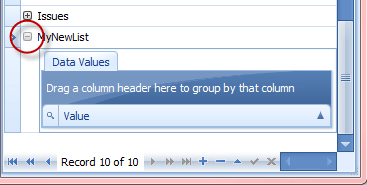
  6. Click the little plus icon just to the left of the name of your new list. A “Data Values” panel will open below it:DataValues
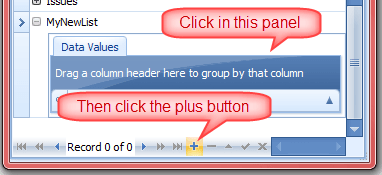
  7. Make sure that the Data Values panel is selected by clicking anywhere within it, then click the little plus button at the bottom of the window:AddListItem
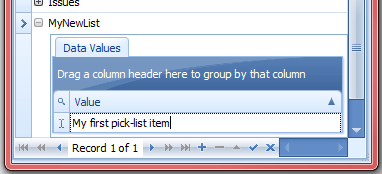
  8. An empty row will appear in the Data Values panel. Type the first item for your pick-list, then press ENTER on your keyboard.FirstPickListItem
  9. Repeat steps 7 and 8 until you have entered all the desired items for your list. If it takes more than a few minutes, consider clicking the Save button at the top of the window so that your new entries are saved, then re-open My Lists and add some more. Your new items are not permanent until the Save button is executed.


Modifying and Deleting Existing Items

From time to time you may want to modify or remove items from a list. To do so:

  1. Open My Lists as in step one above.
  2. Click the little plus box to the left of the list you would like to maintain. The Data Values panel will open, showing the items on your list.
  3. To change an item, just click anywhere in the item’s current text, make your changes, and press the ENTER key on your keyboard.
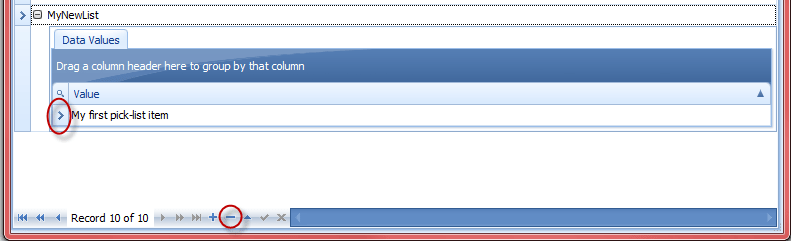
  4. To remove an item, click the “>” icon just to the left of the item to select it, then click the small minus button at the bottom of the window:DeleteItem
  5. When you have completed your changes to the list, be sure to click the Save button at the top of the My Lists window.


Linking Your New List to a Field in Your Screen Form

Now that you have your list, there is one more thing to do – linking it to the field that your SOS support tech converted from a plain text field to a drop or combo field.

  1. If you have First Contact running, exit out.
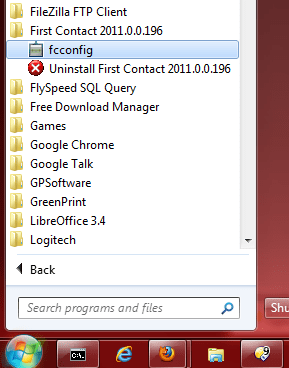
  2. Open the FCConfig utility by clicking your Windows Start button, then Programs, then the First Contact 2010.x.x (the number depending on the version installed).StartFCConfig
  3. Let us assume that the FC field you are converting to use your list is User_StrField1. Find that field in the Field Name column, and click it to select. (Hint: Click the column title to sort the list alphabetically.)
  4. Click the Pencil icon in the toolbar at the top of the window to modify the field configuration.
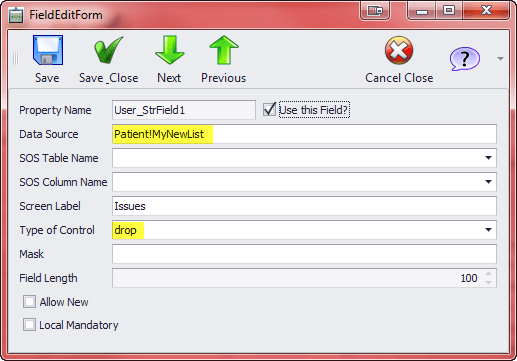
  5. In the Data Source field type Patient!MyNewList, replacing “MyNewList” with the name of the list you just created in First Contact. Make sure that you include the exclamation mark between “Patient” and the name of your list.
  6. Check that it says “drop” or “combo” next to Type of Control. If not, select the correct type from the drop list, or type it in, being careful to type all lower case characters.
  7. Click the Save_Close icon at the top of the window, then, back on the field list, click Save again to finalize your changes and close FCConfig.FieldEditForm
  8. You can now return to First Contact to test your new pick-list field.

How to Batch Claims Using Carrier Category

At times it is desirable to batch claims according to a particular payor or payors. Examples include:

  • Generating a batch of Medicare paper claims using the Medicare-specific formats.
  • Generating electronic claim submission files for just selected payors.

The most efficient way to proceed is by using the Carrier Category setting on the Additional tab of your Carrier/Plan form (Lookups > Insurance Carriers/Plans).

9-26-2011 4-27-33 PM


Create and assign the same Carrier Category to each of the Carrier/Plans that you want to group together for insurance claim runs.

When it comes time to generate insurance, just specify the desired Carrier Category in the batch options to create a batch that contains only claims for those payors assigned to the specified category:


9-26-2011 4-39-15 PM

Note that even a blank category field is significant. If you have assigned certain payors to a category, they will not be included in the batch if you leave the batch option for Carrier Category blank. That is, a blank Carrier Category will match only those payors with no category selected on the Additional tab.

Copy and Paste of Treatment Planning Details

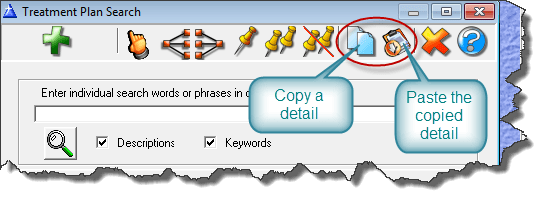
At times it is desirable to have the same detail description in several Treatment Plan classes. For example, let’s say that you have created a detail for the specific symptom “sleep difficulties” in the Problem class “Depression”. This symptom is common to many problems, so SOS provides a quick way to copy the new detail to other relevant classes.

CopyPasteTxPlanDetails

  1. Open the Treatment Plan Search window by highlighting the appropriate section heading (ie: Problems, Goals, Assets, Obstacles, or Interventions) in an existing treatment plan, then click the Add (green plus) icon in the toolbar.
  2. Click the magnifying glass icon to display the entire list of classes and details in the section.
  3. Navigate to the class that already includes the detail you want to copy. In our example, it would be the (Problem) “Depression” class, under which you would see “sleep difficulties.”
  4. Highlight “sleep difficulties” and click the Copy (two sheet of paper) icon on the toolbar. Alternatively, you can simply press the standard Windows key combination for “copy”, <CTRL> and <C> on your keyboard.
  5. Now highlight a different class that should also include the “sleep difficulties” detail. Click the Paste (clipboard) icon on the toolbar, or use the Windows paste key combination, <CTRL> plus <V>.

Emailing Reports From First Contact

While secure email systems are available to send documents containing Protected Health Information (PHI), most regular email transmissions can be intercepted and viewed by parties other than the intended recipient. For this reason, it is a best practice to send such documents as encrypted, password-protected, PDF files.

When viewing an intake form in First Contact, you will notice that there is an icon in the toolbar with the caption “Email Provider”.

7-21-2011 3-26-27 PM

Clicking that icon generates a report in the same format as the screen display, which displays in a report preview window. Either click File > Export Document > PDF

7-21-2011 3-35-38 PM

… or click the Export Document icon on the toolbar.

7-21-2011 3-32-51 PM

In the Export Options window, click the field next to Password Security. Another window will open. Check the first box to Require a password to open the document and type the desired password in the indicated field. When you click OK at the bottom of that window, a confirmation box will appear. Re-type the password and click OK. That window will close and you will be back at the Export Options. Click OK there, then enter the desired location and name for the protected PDF file. Take note of this information. You will need it in order to attach the file to your email.

7-21-2011 3-42-03 PM

You will find yourself back at the report preview window. Just close that window with the X icon.

Open your email application, create your message and attach the document you just created. If you have not pre-shared the document password with the recipient, then you should send it separately via fax or phone. Do not include it in the body of email, as that would defeat the whole purpose of encrypting the document. Sending the password in a second email is almost as insecure. If you will be sending documents to this recipient on a regular basis, it is probably best to establish a standard password that you will use for that purpose and share it with the recipient beforehand.