Querying SOSDATA from within MS SQL Server

A Microsoft Linked Server can be created that uses the SQL Anywhere OLE DB provider to obtain access to a SQL Anywhere database. SQL queries can be issued using either Microsoft’s 4-part table referencing syntax or Microsoft’s OPENQUERY SQL function. An example of the 4-part syntax follows.

SELECT * FROM SOSDATA..SOS.Patients

In this example, SOSDATA is the name of the Linked Server, SOS is the table owner in the SQL Anywhere database, and Patients is the table name in the SQL Anywhere database. The catalog name is omitted (as indicated by two consecutive dots) since catalog names are not a feature of SQL Anywhere databases.

The other form uses Microsoft’s OPENQUERY function.

SELECT * FROM OPENQUERY(SOSDATA, ‘SELECT * FROM Patients’)

In the OPENQUERY syntax, the second SELECT statement (‘SELECT * FROM Patients’) is passed to the SQL Anywhere server for execution.

To set up a Linked Server that uses the SQL Anywhere OLE DB provider, a few steps must be followed.

To set up a Linked Server in SQL Server 2005 or 2008
  1. Open up SQL Server Management Studio.
  2. In the pane on the left, open Server Objects.
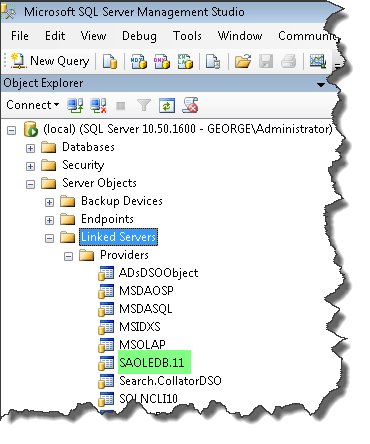
  3. Under Server Objects, open Providers. If you have SOS installed on this server, there should be a provider named "SAOLEDB11". If not, install SOS on the server, taking care to select the "Client" option (because obviously there is a different computer hosting the SOS database and we will be connecting to it as a client). Restart SQL Server Management Studio to see if the driver now appears under Providers. If not, you will have to manually register the appropriate DLLs as follows.

    If you are running 32 bit SQL Server, open a command window and type the following, making appropriate adjustments in the location of the SOS folder:
    REGSVR32  C:\SOS\SA\BIN32\DBOLEDB11.DLL <press enter>
    REGSVR32  C:\SOS\SA\BIN32\DBOLEDBA11.DLL <press enter>

    If you are running 64 bit SQL Server, open a command window and type the following, making appropriate adjustments in the location of the SOS folder:
    REGSVR32  C:\SOS\SA\BIN64\DBOLEDB11.DLL <press enter>
    REGSVR32  C:\SOS\SA\BIN64\DBOLEDBA11.DLL <press enter>

    Again, restart SQL Server Management Studio to refresh. The SAOLEDB11 provider should now appear in the Providers list.

    SNAGHTML1fcaacf

  4. Right-click on Linked Servers and select "New Linked Server".
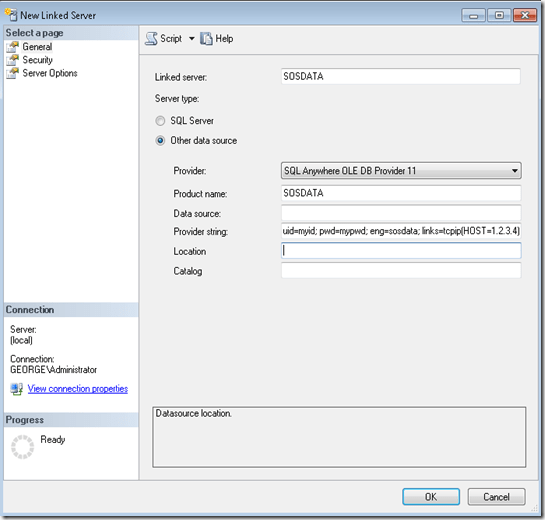
  5. Fill in the General page like this:

    image

    The Provider string is the connection string. Include the user id (uid), password (pwd), engine, aka server name (eng), the network protocol (links), and for good measure, the ip address of the computer on which the database is running as a parameter after the links specification. Here is an example:
    uid=myid; pwd=mypwd; eng=sosdata; links=tcpip(HOST=1.2.3.4)

  6. The "Linked server" field on the General page should contain a Linked Server name in the first field (like SOSDATA used above). The "Other data source" option should be selected and "SQL Anywhere OLE DB Provider" should be selected from the list. The "Product name" field should contain an ODBC data source name (for example, SOSDATA). The "Provider string" field should contain additional connection parameters including user ID, password, engine, and links. Other fields, such as Data source, Location, and Catalog on the General page should be left empty.

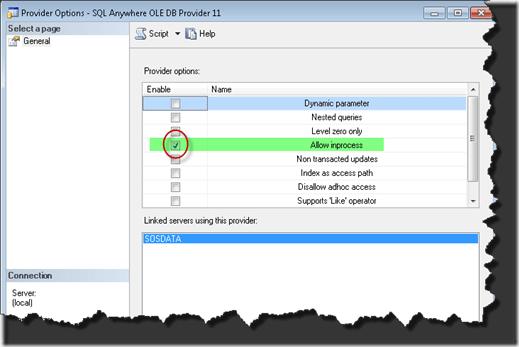
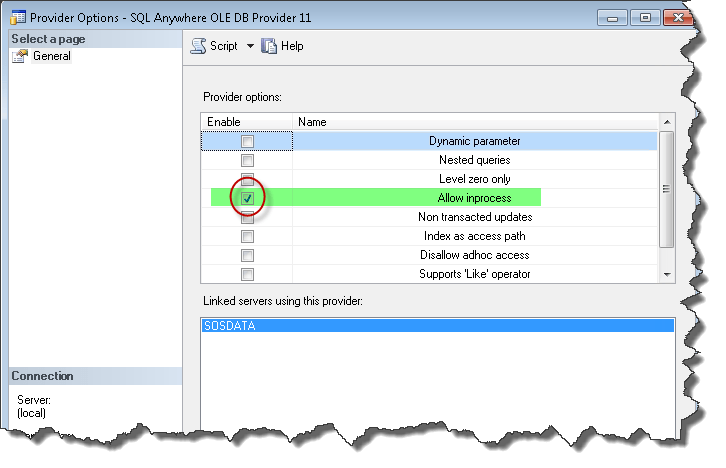
  7. Select the "Allow inprocess" provider option.

    Right-click the SAOLEDB.11 provider in Providers list beneath Linked Servers and select Properties. Check the Allow inprocess option. If the InProcess option is not selected, queries will fail. Save.

    SNAGHTML20f3cc7

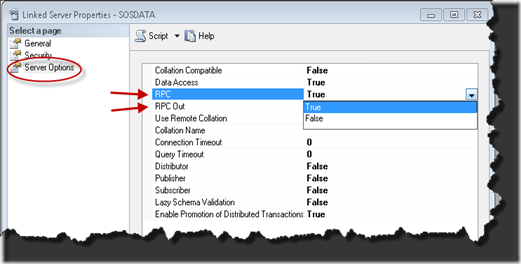
  8. Select the "RPC" and "RPC Out" options.

    Right-click your new Linked Server in the left pane under Linked Servers and select Properties. These options are True / False settings. Make sure that they are set True. The Remote Procedure Call (RPC) options must be selected if you wish to execute stored procedure / function calls in a SQL Anywhere database and pass parameters in and out successfully.

    SNAGHTML213aaef

You should now be able to query tables in SOSDATA using the techniques described at the top of this article.

Storage and Performance Impact of Attachments in SOS

Attachments are all compressed using the standard zip compression algorithm before being imported into the database, so anything that is not already in a compressed format will be significantly reduced in size when stored in the database. (FYI: Documents in pdf format, and graphics in jpg format, for example, are already compressed, so they will take up approximately the same amount of space in the SOS database as they do outside of it.)

Bottom line is that if you use the option to delete the originals after importing, the net storage used will be less than if you just saved the documents separately on your hard disk or network. You also enjoy the benefits of greater security, the convenience of having the attachment information in a handy location, and the peace of mind that your attached documents are backed up along with the rest of your SOS data, with no need for any change in backup strategy or configuration.

Impact on performance of the database should be negligible, assuming appropriate amounts of RAM for the size of your database and modern disk drives.

(#207) Running Queries with DBISQL

The following instructions are specifically for SOS Release 2010 and later.

  1. First, it is necessary to configure your user ID in the Admin Module (Users and Passwords) to allow access from 3rd party products (Access tab option “Grant read-only access from non-SOS products”). If you are not cleared for this type of access, you will have to ask a user with full access to run the query for you. You cannot run queries with the “SUPER” ID; it must be another ID that has the “Grant read-only access” option enabled.
  2. Launch the ISQL utility by doing Start > Programs > SOS Applications > DBISQL. (An alternate, somewhat less user-friendly version can be launched by Start > Programs > SOS Applications > DBISQLC.)
  3. When prompted, type your SOS ID and password (you may find that your password will work only if typed all UPPERCASE) in the appropriate fields on the LOGIN tab, then next to ODBC Data Source select or type “SOSDATA” and click OK.
  4. A screen with multiple windows will open. Type your query in the Command (DBISQLC) or SQL Statements (DBISQL) window and click the Execute button (or press <F9> in either version).

Using the DBISQL version, use Data > Export to save your results in a file. In either version you can add a line to query to do the same. Add a semicolon, then an OUTPUT statement to the query. The following simple query creates a list of patients along with their email addresses and saves it in a “web page” file in the SOS folder called “pt-emails.html”. This HTML file can be viewed in your web browser, or opened, manipulated, and printed using Microsoft Excel:

SELECT lastname, firstname, email
FROM rv_patients
ORDER BY lastname, firstname
; OUTPUT TO c:sospt-emails.html FORMAT HTML

You are not limited to HTML output, by the way. In the example above, the results are output in spreadsheet format because of the keyword LOTUS after FORMAT. By changing the keyword, you can choose from an assortment of output file formats. Among the formats available for your query results are the following:

Format Suggested filename extension (type)

Keyword

Comments

Plain text

TXT

TEXT

The output is a TEXT format file with one row per line in the file. All values are separated by commas, and strings are enclosed in apostrophes (single quotes).
The delimiter and quote strings can be changed using the DELIMITED BY and QUOTE clauses. If ALL is specified in the QUOTE clause, all values (not just strings) are quoted.
TEXT is the default output type. This output format used to be called ASCII in previous versions of DBISQL.

Fixed width columns

TXT

FIXED

The output is fixed format with each column having a fixed width. The width for each
column can be specified using the COLUMN WIDTHS clause. No column headings are output in this format.

Web page

HTM or HTML

HTML

Open with your web browser. Also can be loaded in Excel and some other spreadsheet applications.

XML web browser format

XML

XML

Some programs and systems can import and/or process data in XML format.

You can save this query with a name by clicking File > Save and run it whenever you want by opening DBISQLC or DBISQL and clicking File > Open to recall it. By convention, queries like this are given names ending in SQL, like EMAILS.SQL, for example. I would suggest that you save it in your SOS folder so you don’t lose it. If you really want to get fancy, you can create a shortcut on your desktop to run your query with one double click (plus typing in your ID, etc. when prompted):

C:SOSSAbin32DBISQLC
C:SOSEMAILS.SQL
, or “C:SOSSAbin32DBISQL
C:SOSEMAILS.SQL

Documents you may find helpful include the rather dated, but still relevant, annotated data dictionary: http://www.sosoft.com/files/downloads/sosddct.pdf

and a set of entity diagrams showing links among tables for the most commonly used data: http://www.sosoft.com/files/downloads/sosdpics.pdf

It is most important that you review the final chapter (Accessing SOS Data from Other Programs) in sostech.pdf, located in your SOS folder. This chapter explains the basics of the database organization. You will be lost in doing anything beyond the simplest queries without that foundation.

(#200) Upgrading from SOS 2009 to SOS 2010

The upgrade to SOS 2010 is quite similar to previous SOS upgrades that you may have done. It does, however, replace your older Sybase database components with newer versions. In some cases that change will require a couple of post-installation steps, which are detailed below.

All Installations, Including Network Workstations

You may find that one or two obsolete shortcuts remain in your Windows Start > Programs > SOS Applications menu.


The DBISQLG query utility has been replaced by the new DBISQL (no G at the end). The old program shortcut will no longer work and should be removed from the SOS Applications menu. Similarly, the shortcut to bring up the Sybase documentation now has a slightly different name, Sybase SA Manuals. The old Sybase ASA Manuals shortcuts will no longer work, so that shortcut should also be deleted, to avoid confusion.

To delete a menu shortcut, just right-click the shortcut and then click Delete on the pop-up menu. The two menu entries to be deleted are circled in the figure to the left.

Standalone Computer Installations

In most cases, the installation will make all necessary changes for you, except, possibly, the removal of the now obsolete menu items in the Start > SOS Applications menu.

64 Bit Windows Option

If you are running your software on a 64-bit version of Windows, you can choose to run the 64-bit version of the database engine rather than the default 32-bit version. Although either one will work fine in your environment, if you have more than three GB of RAM in your system, you may experience better performance with the 64-bit engine. Changing from one to the other is quite easy:

  1. Select Start > Programs (or All Programs) > SOS Applications > ODBC Administrator.
  2. Click the System DSN tab.
  3. Double-click SOSDATA.
  4. Click the Database tab.
  5. In the Start line, scroll to the left, so you can see the beginning of the command.
  6. Replace the number 32 with 64. The command will now start with c:\sos\sa\bin64\dbeng11.exe
  7. Click OK to save, then OK again to close the ODBC Administrator applet.

The next time you start SOS, the database will start using the 64-bit engine!

Database Servers

Edit the SERVER.PRM File

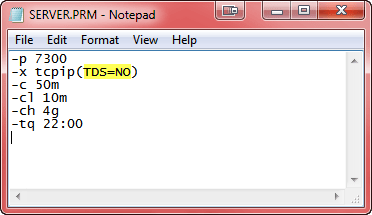
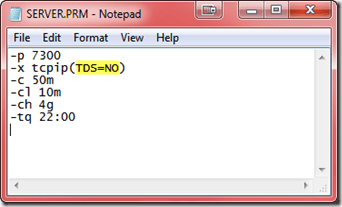
In the old version of the Sybase database engine, the recommended network packet size was 1480 bytes. With the new engine, the default and recommended size is 7300 bytes. For best performance, therefore, SOS recommends that you remove the “-p 1480” parameter from your SERVER.PRM file, or change the “1480” to “7300”. In addition, to close a potential security threat, SOS strongly recommends that you add the parameter “TDS=NO”, in parentheses, after “tcpip”. Here is an example:
server_prm

Modify all Database Startup Shortcuts

Prior to the 2010 release, the database engine was called DBSRV9.EXE and was located in \SOS\ASA\Win32. The new database engine is named DBSRV11.EXE and is located in \SOS\SA\BIN32, with the 64-bit version located in \SOS\SA\BIN64. As a result, old shortcuts will no longer work and should be deleted. There is a shortcut in Start > All
Programs > SOS Applications to start the new database server, using the 32-bit engine (Start SOSDATA Server). You should delete any left-over shortcuts and create new ones by copying the one in the Start menu:

If you are running the database on a 64-bit Windows machine with more than 2 GB of RAM, you will probably see better performance by using the 64 bit engine, so after creating the 32-bit shortcut, just edit its properties as shown below, modifying the Target location from BIN32 to BIN64:

Delete and Re-create the Database Service

You may have been running your database as a windows background service, or perhaps you want to start doing so. The main advantage to running as a service is that the database will start and run whether or not anyone is logged into the server computer’s console. Services created in versions prior to SOS 2010 appear in the Windows Service Manager in the form:

Adaptive Server Anywhere – mysos

where “mysos” is the name you gave to the service when you created it. You must first remove the existing service, if there is one, then create a new one. The new one will appear in the list of services with a name in the form:

SQL Anywhere – mysos

To delete the existing service:

  1. Open a command window, being careful to use the Run as administrator option if you are working on Windows 7. Windows 8 and newer, type CMD in the Start menu Search field, then right-click CMD.EXE in the search results and select “Run as administrator”.
  2. Even if you plan to run the 64 bit database engine, change to the \SOS\SA\BIN32 directory:
    CD \SOS\SA\BIN32 <enter>
  3. Assuming that the name of your existing service is “mysos”, delete it with this command:
    dbsvc –y –d mysos

To create the new service:

  1. If you are not already in a command window running with Administrator rights, follow steps one and two above.
  2. Now create the new service with the following command. The options in this example will set the service to run under the system account (-sa), as a network service (-t network), to start automatically (-s auto), to display the database icon in the system tray (-i), and to be named “mysos” (-w mysos). It will appear in the Windows Services Manager as “SQL Anywhere – mysos”. If you are running the database in 64-bit Windows, using the 64-bit option is recommended, but either version of the engine will work. The 64-bit engine often provides better performance, especially for larger databases. If you are running in 32-bit Windows, you MUST use the 32-bit command. These commands would be typed on a single line, of course. Note that the -i option to display the icon in the system tray won’t work on Windows 7, or Server 2008 R2 and later, so omit that option if using one of those. Service configuration commands are case sensitive. Type your options exactly as shown (eg: “automatic” will fail but “Automatic” will work). If you still have trouble getting the service created, leave out the “-s Automatic”. You can change the properties to “automatic” from the Windows Services list after it is created.
    32-bit Windows:
    dbsvc -as -t Network -s Automatic -i -w mysos c:\sos\sa\bin32\dbsrv11.exe @c:\sos\server.prm c:\sos\data\sosdata.db
    64-bit Windows:

    dbsvc -as -t Network -s Automatic -i -w mysos c:\sos\sa\bin64\dbsrv11.exe @c:\sos\server.prm c:\sos\data\sosdata.db
  3. After executing the command, you will find a new Windows service listed in Windows’ Administrative Tools > Services applet: SQL Anywhere – mysos. You can adjust the properties for the service just as you would for any other service.

For more detailed discussion and instruction for running SQL Anywhere as a Windows service, see:

https://sos-resources.info/g4/running-the-sos-sql-anywhere-11-database-as-a-windows-service/

Adjust Scheduled Tasks

You may be using one or more Scheduled Tasks in Windows to control starting or stopping your database. Normally stopping the database is handled with a –tq parameter in the SERVER.PRM file, such as:

-tq 22:00

to automatically shut down the database at 10:00 pm, but if running as a service, it is possible that you are using a scheduled NET STOP command to do so. More likely, however, if you check your Windows Scheduled Tasks, you will find a task that starts your database server engine each morning, whether you run it as a foreground task, or as a Windows service.

If you have a task to execute a CMD or BAT file that launches the database, find and edit the batch file, replacing the old c:\sos\asa\win32\dbsrv9.exe with the new c:\sos\sa\bin32\dbsrv11.exe (or c:\sos\sa\bin64\dbsrv11.exe) command.

If you are restarting a service, that service no longer exists, so change the command to start the correct service. For example, you might have scheduled the command:

NET START “Adaptive Server Anywhere – mysos”

which now should be:

NET START “SQLANYs_mysos”

This name, of course, should match the name of the service you created above. Check the properties of the new service in your Control Panel > Administrative Tools > Services to be sure of the name. Once you open the Properties dialog for the service, you will see the service name at the top of the first tab:

Windows 7 –

6-15-2012 5-05-43 PM

Windows Server 2008 R2 –

6-15-2012 5-08-20 PM

Network Workstations

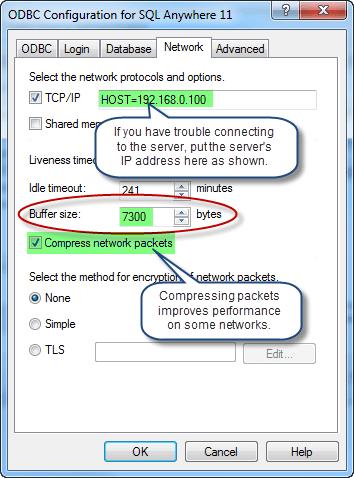
After installing the new version of the software on a network workstation, including a terminal server, check the ODBC settings to be sure that the Buffer Size setting on the Network tab is set to 7300 bytes to match the packet size setting on the server. While on this tab, note that specifying the IP address of your database server in the form HOST=123.123.123.123 (using your own server’s address) is sometimes necessary if the workstation cannot otherwise locate and connect to the database server. Unless you are having a problem, do not specify this parameter. Also on the Network tab is an option to Compress network packets. Using this option can make a significant performance improvement on some networks, but can slow things down on others. If your servers and workstations are relatively speedy, but your network is slow, this option should help. On the other hand, if your server and/or workstations are already working pretty hard, and you have abundant network capacity, checking this option may actually slow things down. You will have to experiment to know for sure. Test by timing the generation of large reports.

SNAGHTML178e068

Updated 2/26/2009

Working with Grid Windows (Lists)

Sorting

To sort records by a column’s values and replace existing sort conditions that are applied to the current or other column(s), click the target column’s header, until an UP or Down Arrow icon is displayed within the header. The Up and Down Arrows indicate ascending and descending sort orders, respectively.

To sort rows by a column’s values preserving existing sort conditions, do one of the following:

  • Click a column’s header holding the SHIFT key down, until an UP or Down Arrow icon is displayed within the header.
  • Right-click a column’s header and select Sort Ascending or Sort Descending from the context menu.

To remove sorting by a column, click a column header while holding the CTRL key down.


Grouping

Group Data

To group by a column, do one of the following:

  • Drag a column header from the column header panel to the Group Panel.
  • Right-click a column header and select Group By This Column from the context menu:

Ungroup Data

To ungroup data by a grouping column, do one of the following:

  • Drag a column header from the group panel to the column header panel.
  • Right-click a grouping column’s header and select UnGroup from the context menu.

To remove grouping by all columns, right click the group panel and select Clear Grouping from the context menu:

Change Group Order

To change the group order, move a grouping column header to another position within the group panel:

Customizing Summaries

End-users can display and/or hide total and group summaries using the Runtime Summary Editor.

Customizing Total Summaries

If the Summary Panel is displayed within a View, right-click it to invoke its context menu, and select ‘Customize…’.

This invokes the Total Summary Editor, allowing an end-user to manage total summaries.

Customizing Group Summaries

If data grouping is applied, right-click the grouping column’s header to invoke its context menu, and select ‘Group Summary Editor…’.

This invokes the Group Summary Editor, allowing an end-user to manage group summaries.

Sorting Group Rows By Summary

Sort Group Rows By Summary

To sort group rows by summary values (if any), an end-user should do the following:

  • Invoke the grouping column’s context menu by right-clicking the column’s header.
  • Select the required summary item (if any), by whose values group rows should be sorted, and the sort order within the ‘Sort By Summary’ submenu, as shown in the image below:

Unsort Group Rows By Summary

Do one of the following:

  • Click a column’s header.
  • Invoke a column’s context menu and select Clear Summary Sorting.

Filtering

Invoke the Filter Dropdown List

In Table Views, hover over the column header. Click the filter button that appears within the column header.


Create a Filter Condition

To select records that contain a specific value in a specific column/card field, do the following:

  • Invoke the filter dropdown list containing available filter values.
  • Select the required filter value in the filter dropdown list:

    The filter dropdown list will be closed immediately, and the control will display the records which contain the specified value in the specified column/card field.

    If the filter dropdown list provides check boxes to the left of the filter values, multiple values can be selected (checked) simultaneously. In this mode, click Ok to close the filter dropdown list and apply the filter.

You can sequentially filter data against multiple columns.

Clear the Filter

To clear the filter applied to a column, do one of the following:

  • Invoke the filter dropdown list and click (All).
  • Right-click a column’s header and select Clear Filter.
  • To clear the grid’s filter, click the Close Filter button within the Filter Panel:

Disable/Enable the Filter

Toggle the checked state of the Enable Filter box displayed within the Filter Panel:

Using the Automatic Filter Row

The automatic filter row (if shown) allows end-users to filter data on the fly. To filter data, type text directly into the row. When you input text within the row, a filter condition is automatically created based upon the values entered, and applied to the column.

Showing and Hiding Columns

Hide Columns

To hide a column, drag its header and drop it onto the Column Chooser if it’s open:

Show Columns

Open the Column Chooser, drag the required column’s header from the Column Chooser and drop it onto the column header panel.

Navigating Through Rows and Cells

To move focus between cells and rows, use the ARROW, TAB, HOME, END, PAGE UP and PAGE DOWN keys. Note that the ARROW, HOME and END keys are used for navigation between rows/cards only when the focused cell is not being edited. Otherwise, these keys affect focus movement within the currently edited cell.

To focus the next cell, do one of the following:

  • Press TAB.
  • In Table Views, press RIGHT ARROW. In Card Views, press DOWN ARROW. If a cell editor is active, pressing RIGHT ARROW moves focus to the next cell if the caret is positioned at the end of the current cell’s text or if the cell’s text is selected in its entirety.

To focus the previous cell, do one of the following:

  • Press SHIFT+TAB.
  • In Table Views, press LEFT ARROW. In Card Views, press UP ARROW. If a cell editor is active, pressing LEFT ARROW moves focus to the previous cell if the caret is positioned at the beginning of the current cell’s text or if the cell’s text is selected in its entirety.

To focus the first cell within the focused row, press HOME (in Table Views).

To focus the last cell within the focused row, press END (in Table Views).

To focus the first row/card:

  • Press CTRL+HOME in Table Views.
  • Press HOME or CTRL+Home in Card Views.

To focus the last row/card:

  • Press CTRL+END in Table Views.
  • Press END or CTRL+END in Card Views.

To move focus to the Automatic Filter Row displayed at the top of a Table View, do one of the following:

  • Click this row.
  • If the top data row is focused, press CTRL+UP ARROW.

Selecting Rows

Select Individual Rows

To select a row and clear the existing selection, click its data cell or select the row using the ARROW keys.

To select a row and preserve the current selection, click its data cell holding the CTRL key down.

To toggle the focused row’s selected state, do one of the following:

  • Press CTRL+SPACE.
  • Click the row while holding the CTRL key down.

Select a Range Rows

To select all rows, press CTRL+A. Before pressing this shortcut, ensure that the focused cell is not being edited.

To select a continuous range of rows, you can do the following:

  • Use ARROW, PAGE UP, PAGE DOWN keys while holding the SHIFT key down.
  • To selects all rows between the currently focused row and another one, click the target row while holding the SHIFT key down.

Resizing Columns

To change a column’s width, drag the right edge of its header: